In this tutorial, we will cover how SQL Reports can be checked into source control (Git) with Azure DevOps. This is a general, lower level guide to doing this using user credentials, Visual Studio, and Git via Visual Studio.
This is the initial step to get the source code locally on your machine. We will need to clone a copy of the remote Git Repository. We will not set up SSH Keys and use user credentials to access the repository.
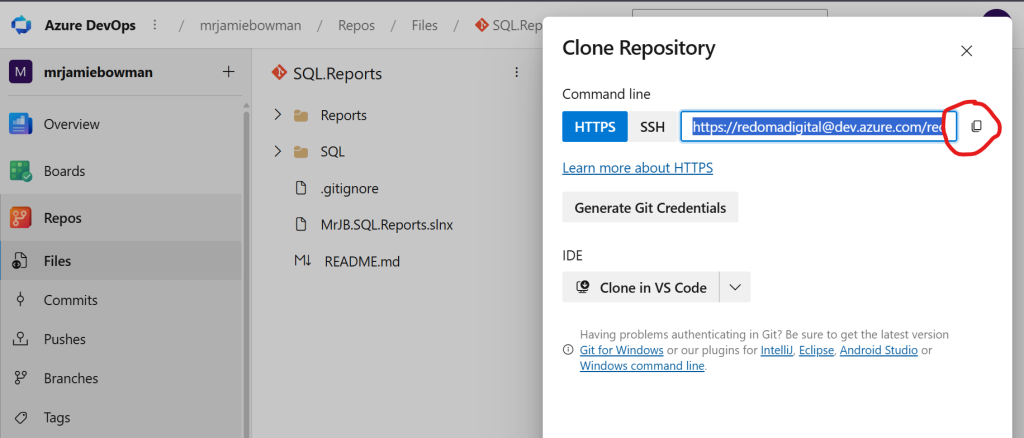
You will need to get the HTTPS url from Azure DevOps for the Repository.
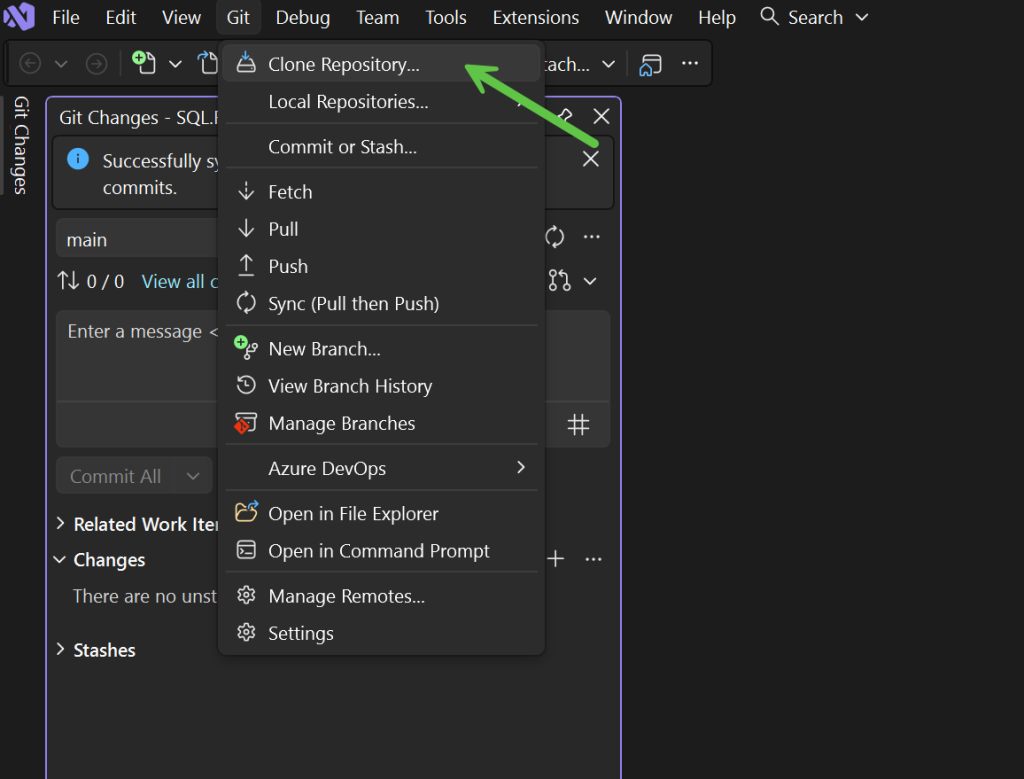
In Visual Studio you will need to select the “Clone Repository” menu option.
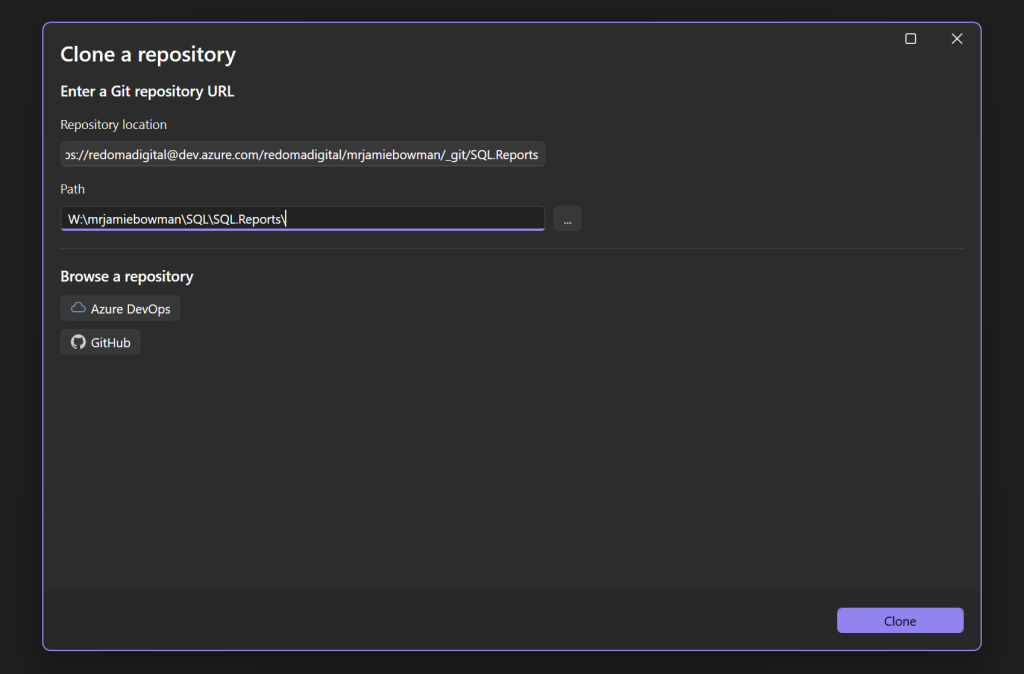
This will open a dialog where you will paste the url to the repository. Make sure you set the path to where you want to clone the repository.
Then click “Clone”. This will pull all of the source code down locally.
Branching
I want to mention branching and what this means. In this example we will have only one branch, which is main. However, branches can be created off the trunk branch, in this case main and sometimes developer create dev or feature-4322 feature branches. Then code has to be merged. This part gets a big complicated for new users or business users.
Copying in Your Changes
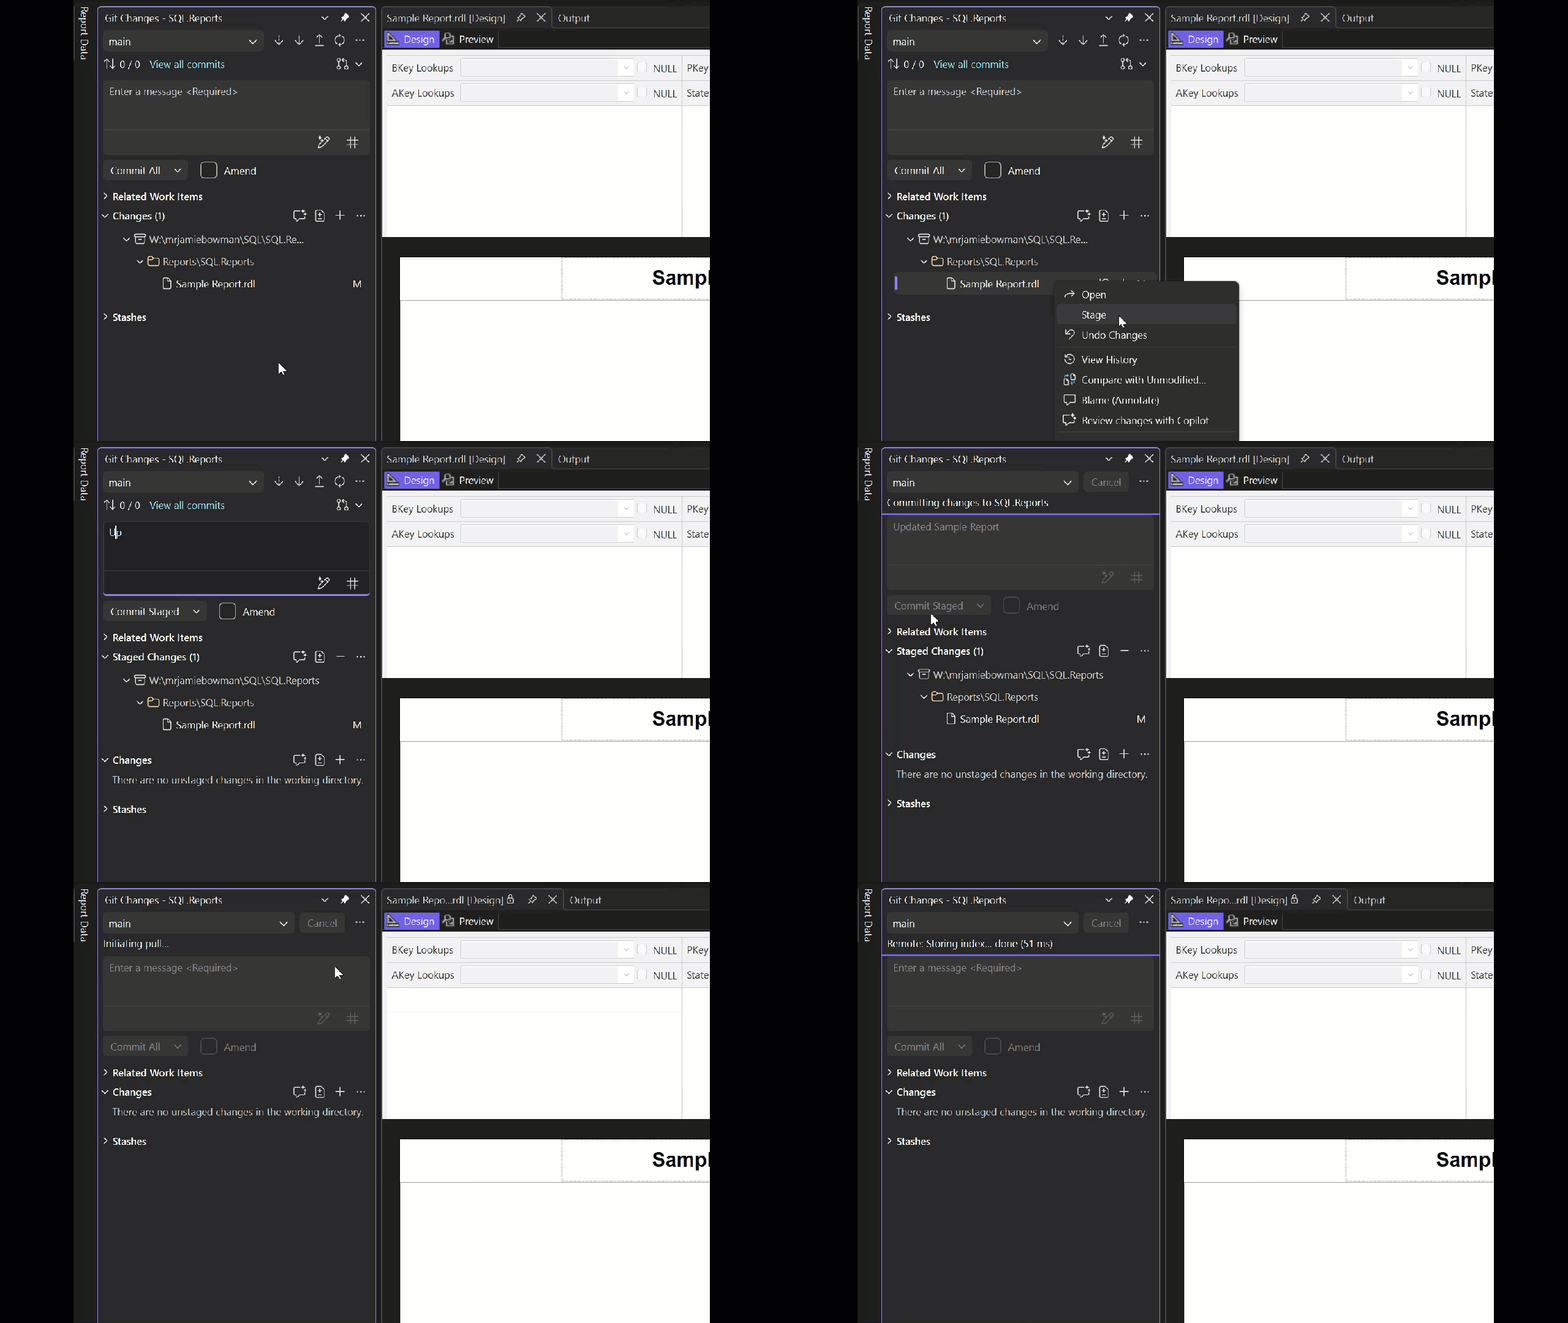
If you’ve made changes to a SQL Report you can download this report from the report server. Then drop this file into the SQL Reports Folder in the locally cloned repository.
I’ve created and I am sharing a .NET Microservice that takes a list of sites and runs availability checks. This is useful for internal or private networks (internal). Azure Application Insights, has capabilities that can run availability checks from multiple regions but it must go over the public internet. This creates a problem for internal applications that need tracking.
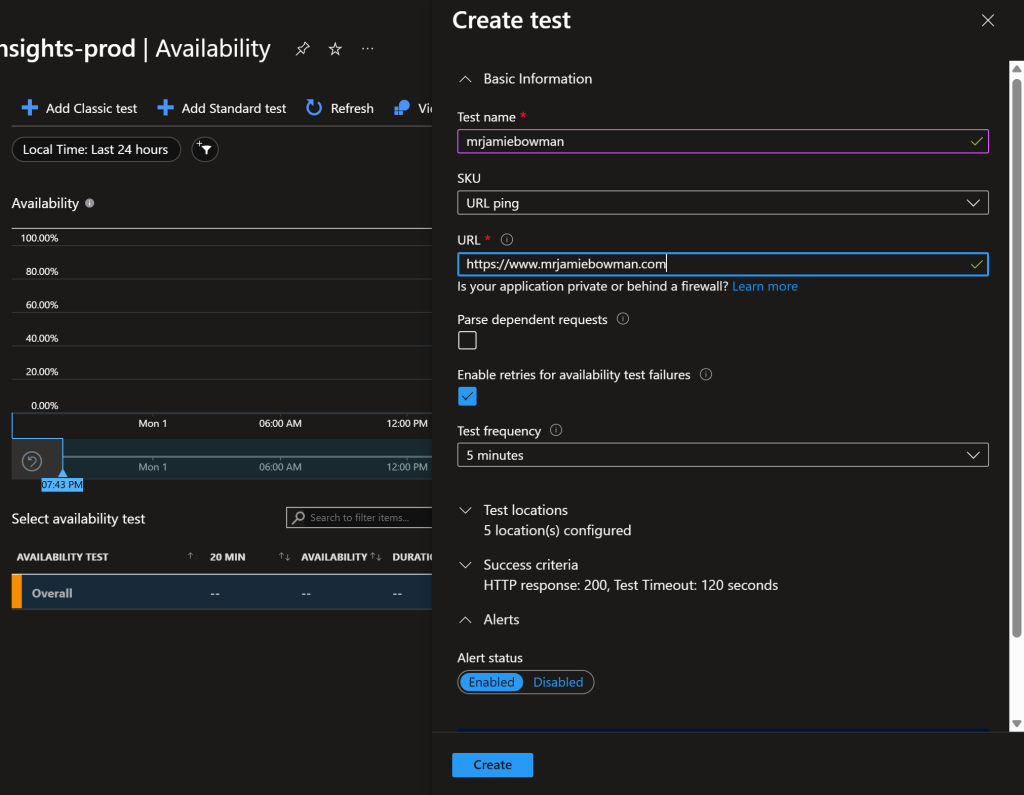
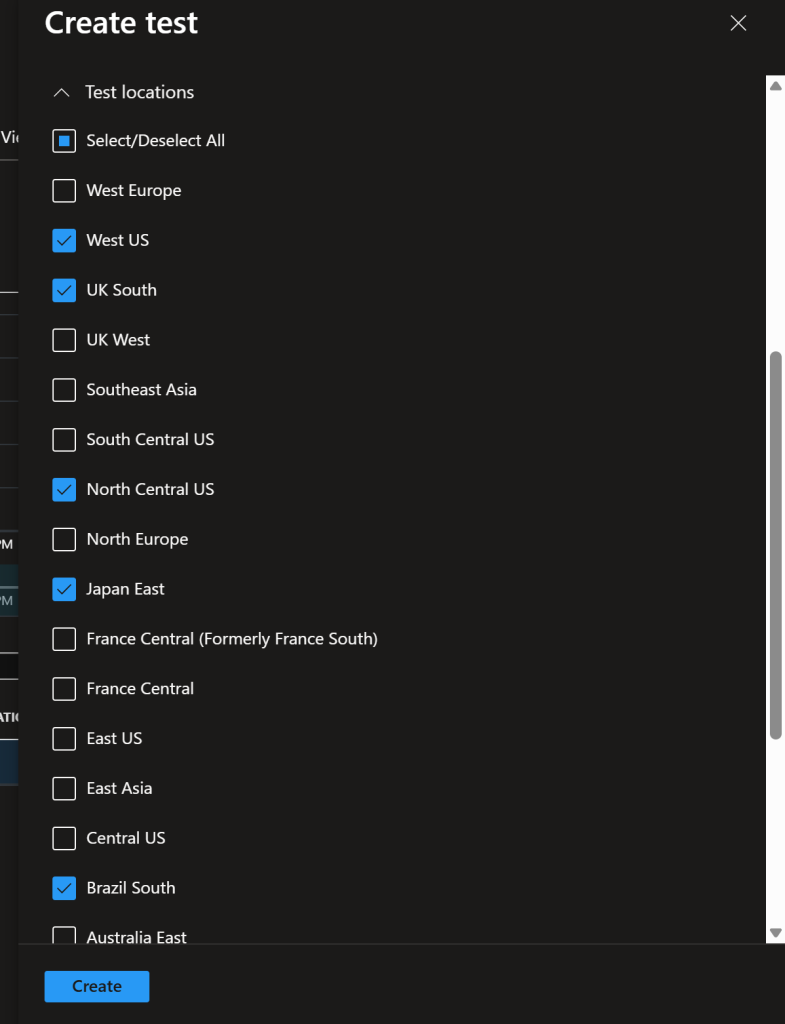
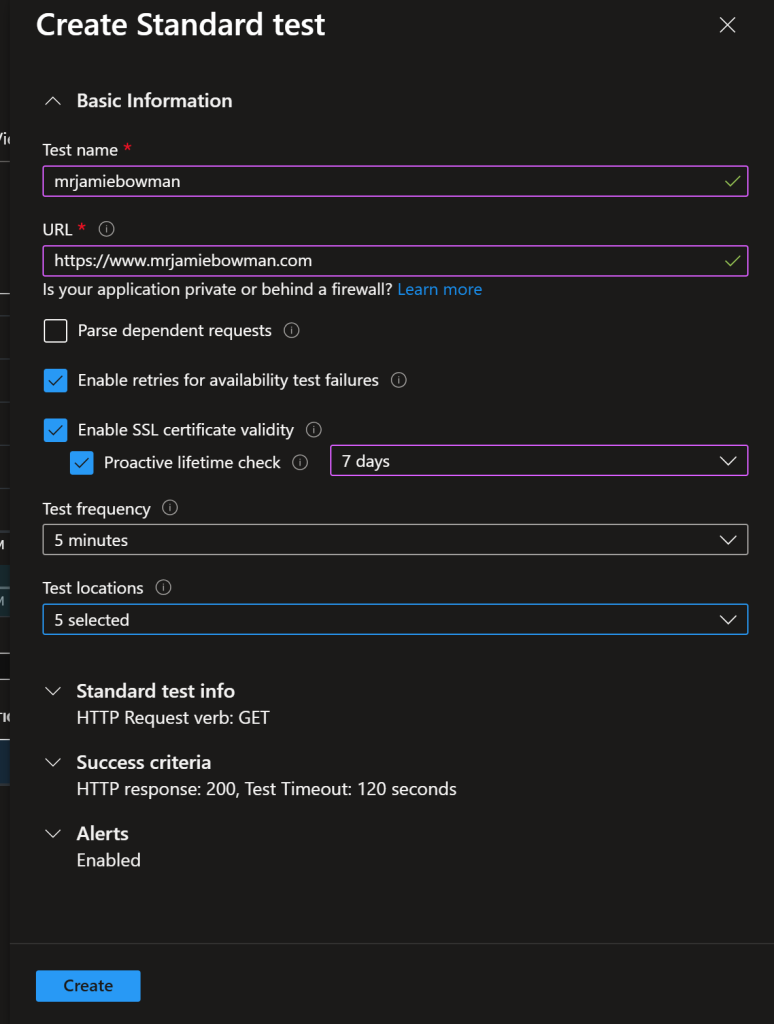
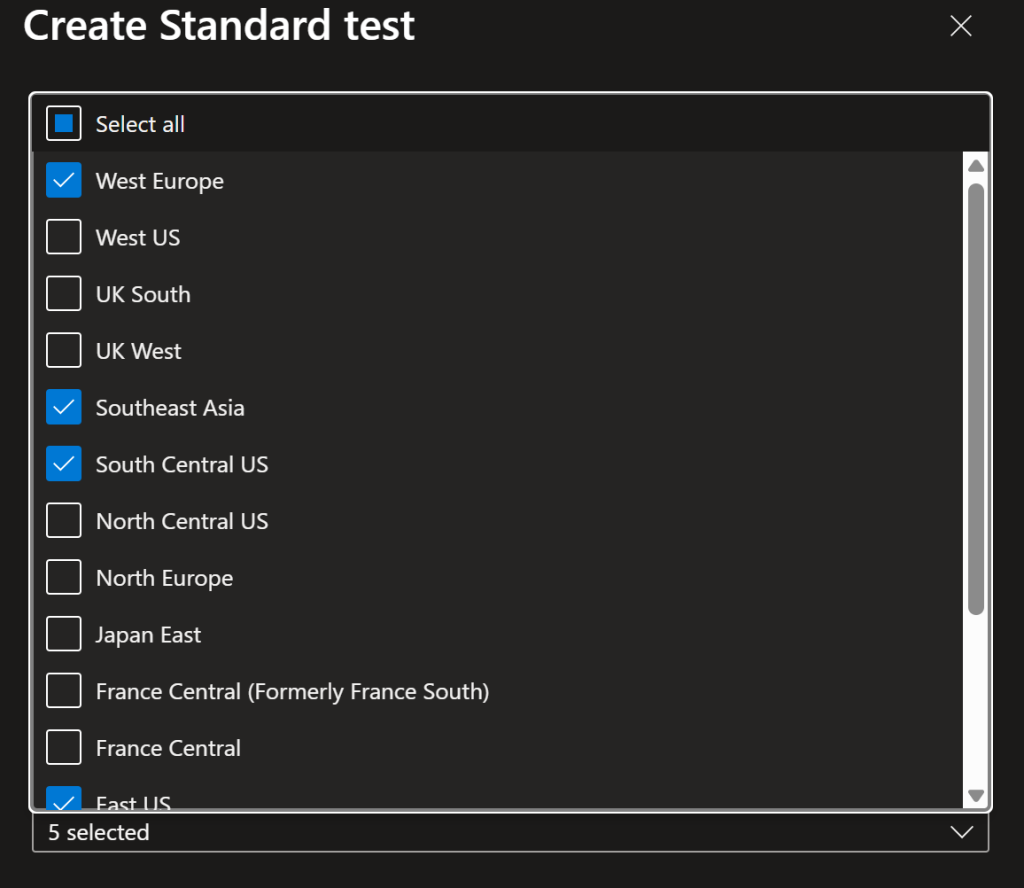
I’m going to show how to set up an Availability Check in Application Insights. I think this is a good place to start so we can compare the process and functionality with setting up a private network check.
Classic Tests
These tests are basic in nature and do not check the SSL validity.
Standard Test
A standard test has slightly more capabilities than the Classic Test. This test can include SSL validity.
Dashboard Availability Check Blades
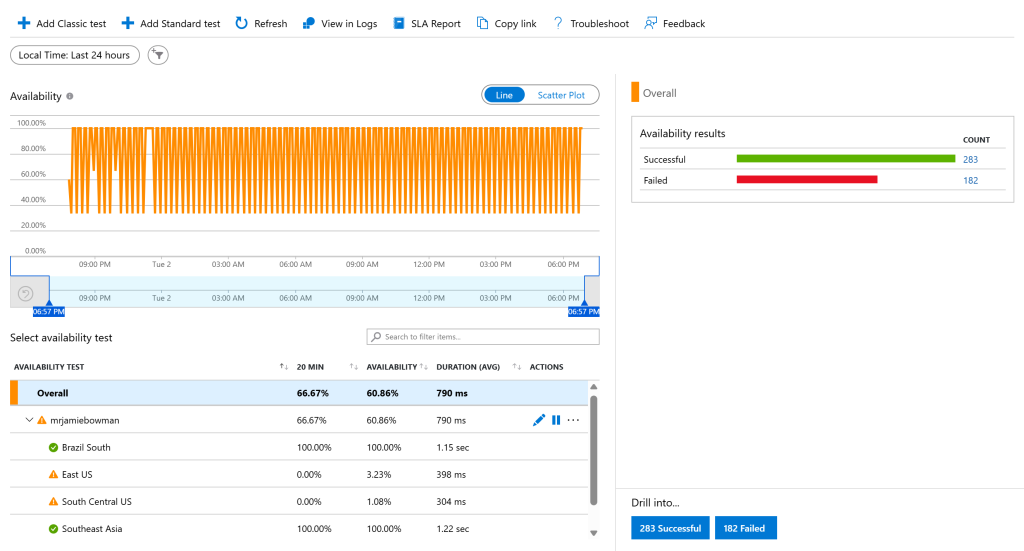
I let this Standard Availability Check run over night. What you should notice here is that this is capable of checking from multiple international regions and tracks how long it takes to load. This is averaged out over 20 minute time span and will give you an idea of where it’s loading, if it’s loading, and how long it takes to load.
Analyzing Failed Tests
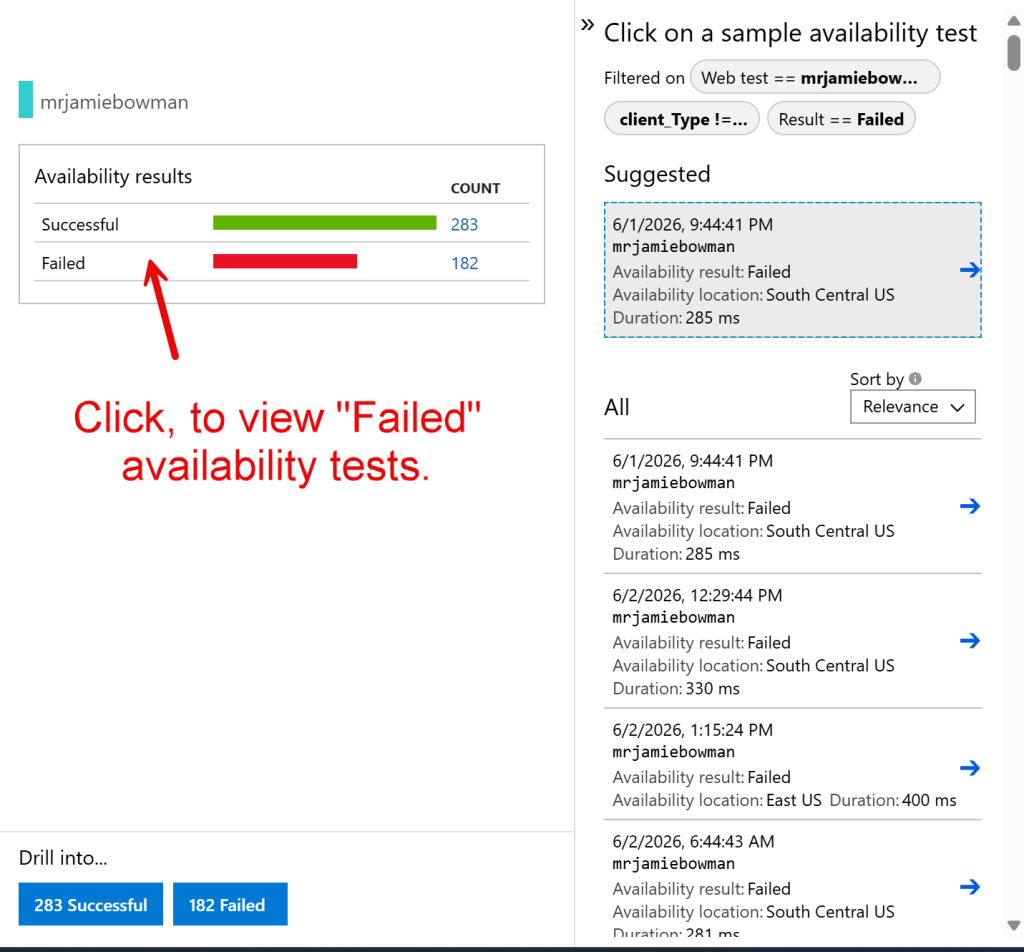
Now, I do have some failed results which works well for this example. If we click on “Failed” it opens a drawer with a list of recently failed tests. We can drill down into the error to see what’s causing it.
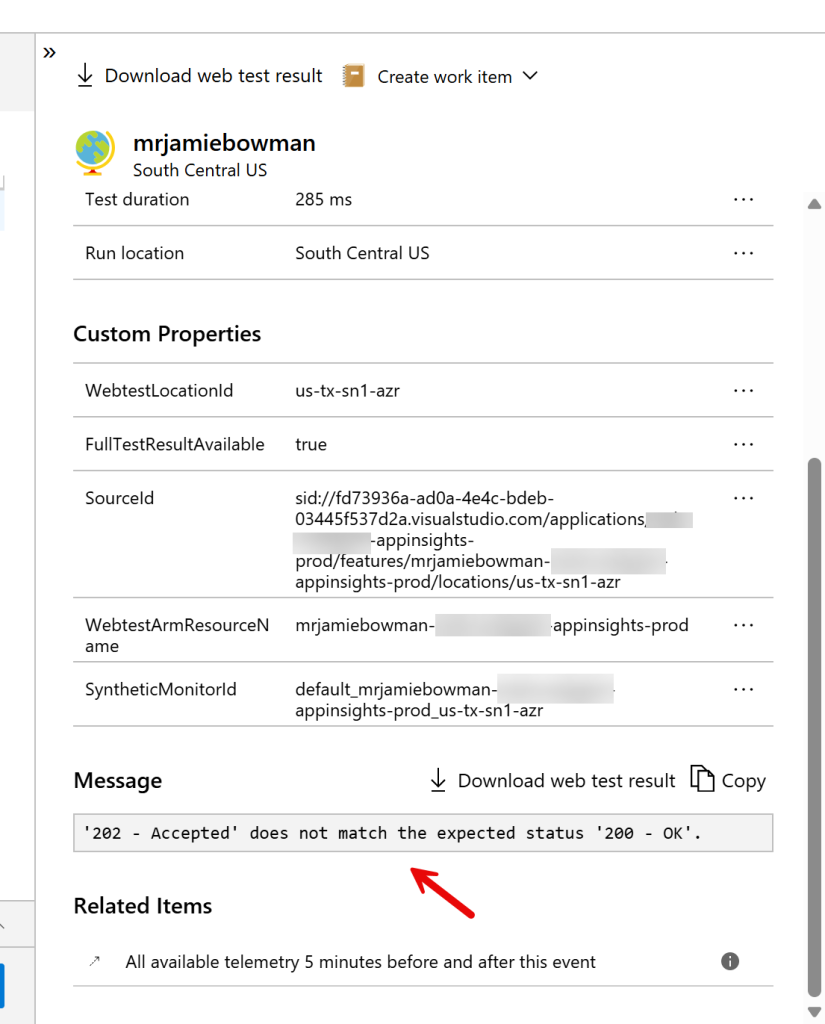
When we drill down into the message we can see that it’s a “202 – Accepted”, which makes this a false positive. This is succeeding, it’s just returning an unexpected acceptance message.
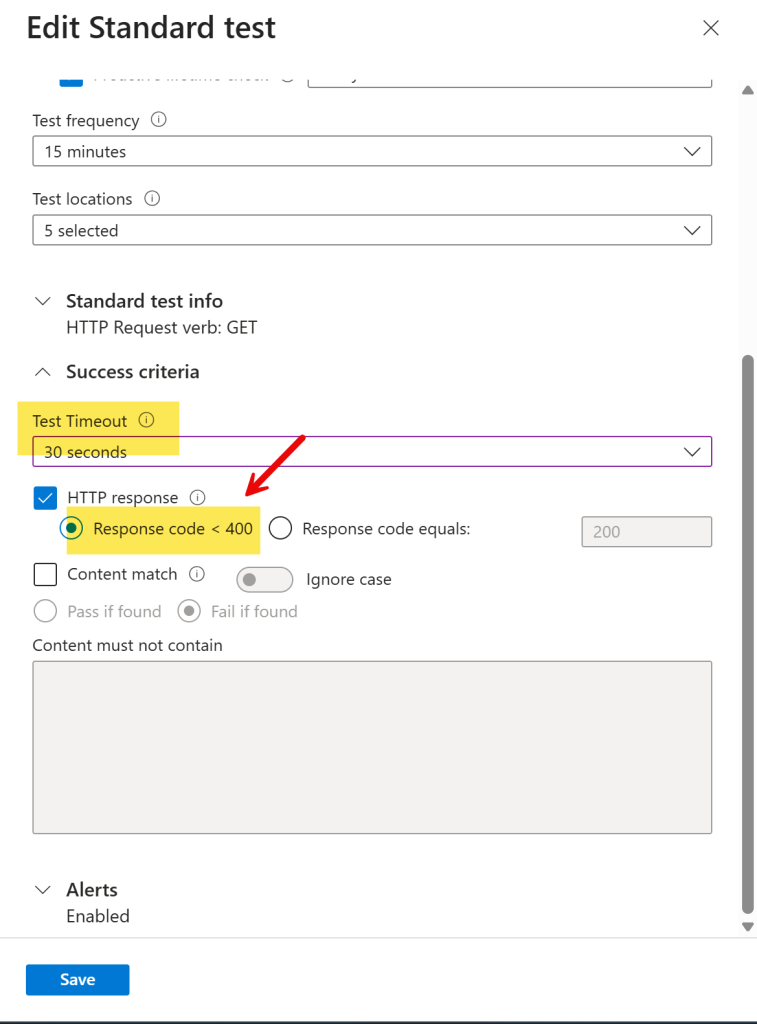
I suspect this is happening because of caching or some sort of intermediate service. There’s an easy work around to where instead of setting the acceptance criteria to only take HTTP Status Codes of 200, we can select “Response < 400” which covers more status codes. This will fix my issue and set it to fail when something is critically wrong.
Response < 400
Accepted
200 OK
201 Created
202 Accepted
204 No Content
301 Moved Permanently
302 Found
304 Not Modified
Fail
400 Bad Request
401 Unauthorized
403 Forbidden
404 Not Found
500 Internal Server Error
503 Service Unavailable
Internal: Availability Checks on a Private Network
With the Classic and Standard Tests going over the public Internet, we won’t be able to test over a private network. This is where it gets tricky because we need to build a .NET Microservice that can track the web application internally and push that data to Application Insights.
Useful
Private Networks
Firewalled Networks
Public GitHub
I wrote and am sharing a .NET Microservice that can run in Kubernetes and run the checks on an internal network.
I want to high-light what the SDK code looks like to correctly frame how this works. This is what we want to do if we want to push directly to Application Insights.
// this is what makes it show up in the Application Insights Availability blade.
var availability = new AvailabilityTelemetry
{
	Name = site.Name,
	RunLocation = site.Location ?? Environment.MachineName,
	Timestamp = timestamp,
	Duration = duration,
	Success = success,
	Message = message
};

availability.Properties["url"] = site.Url;
availability.Properties["machine"] = Environment.MachineName;
availability.Properties["environment"] = Environment.GetEnvironmentVariable("ASPNETCORE_ENVIRONMENT") ?? "Unknown";

_telemetryClient.TrackAvailability(availability);
Deployment
I’ve included a Helm Chart in the application. What I do when I have an open source project like this, is, I set up a new repository in Azure DevOps with a Git Submodule. I then run my own build process, push to the Azure Container Registry and deploy the necessary configuration to Kubernetes. This works really well because it gives me a level of customization and security within my environment.
Alternatively, you could use the Charts and the public image on DockerHub.
In distributed environments using a centralized configuration store and secret store can improve security posture, increase productivity, and make managing secrets much more effective. In this article, I’ll cover how these technologies play together and demonstrate some tips and tricks.
This is subject to change but starting out, Basic Azure App Config is free and Standard Azure App Config is around $36 dollars a month. Key Vault can be cheap for secrets costing less than a dollar for small applications. They do charge more for certificate generation, etc.
The most benefits come from combining Azure App Config with Key Vault and not one individually. Together they make a wonderful team with different strengths. App Config will reference secrets in Key Vault. When retrieving configuration from App Config it will return the secrets as well. This makes it a breeze to work with.
Command Line Integration
All of this can be used with command-line integration so we can read, write and audit configuration and secrets in scripts or a terminal.
Azure App Config
# login
az login --use-device-code

# variables
rg="rg-dev"
location="centralus"
appConfigName="appcs-dev"
keyVaultName="kv-dev"

# set
az appconfig kv set \
  --name $appConfigName \
  --key "App:Name" \
  --value "App" \
  --yes

# set with label
az appconfig kv set \
  --name $appConfigName \
  --key "Logging:LogLevel:Debug" \
  --value "Information" \
  --label "dev" \
  --yes

# list
az appconfig kv list \
  --name $appConfigName

# list by label
az appconfig kv list \
  --name $appConfigName \
  --label "dev"

# show specific key
az appconfig kv show \
  --name $appConfigName \
  --key "AuthCheck:DiscoveryUrl"

# delete
az appconfig kv delete \
  --name $appConfigName \
  --key "App:Name" \
  --yes
Azure Key Vault
# login
az login --use-device-code

# variables
rg="rg-dev"
location="centralus"
appConfigName="appcs-dev"
keyVaultName="kv-dev"

# set
az keyvault secret set \
  --vault-name $keyVaultName \
  --name "SqlConnectionString" \
  --value "Server=tcp:example.database.windows.net;Database=AppDb;..."

# read
az keyvault secret show \
  --vault-name $keyVaultName \
  --name "SqlConnectionString"

# read
az keyvault secret show \
  --vault-name $keyVaultName \
  --name "SqlConnectionString" \
  --query "value" \
  -o tsv

# list
az keyvault secret list \
  --vault-name $keyVaultName

# delete
az keyvault secret delete \
  --vault-name $keyVaultName \
  --name "SqlConnectionString"
Key Vault
Secret Versioning
Key Vault can do secret versioning which means it’s easy to “rollback” or see what the previous secret version was or if we need to we can point to a certain version of a secret from App Config. The number on the end represents the version (4321c6d3a123456789048a39123456b7).
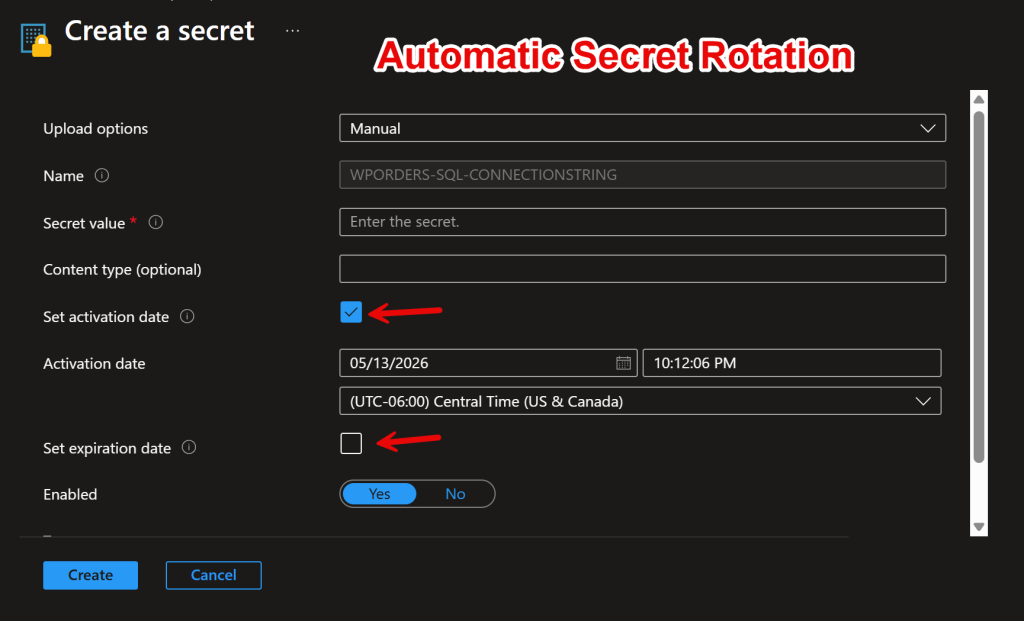
With Key Vault we can rotate keys on a schedule. This is a built in feature where one secret can become active or inactive at a scheduled time period. This is a wonderful feature but it can be tricky to implement. We would need to restart the service or properly implement App Config to reload configuration (It can be tricky to get working.)
Azure App Config
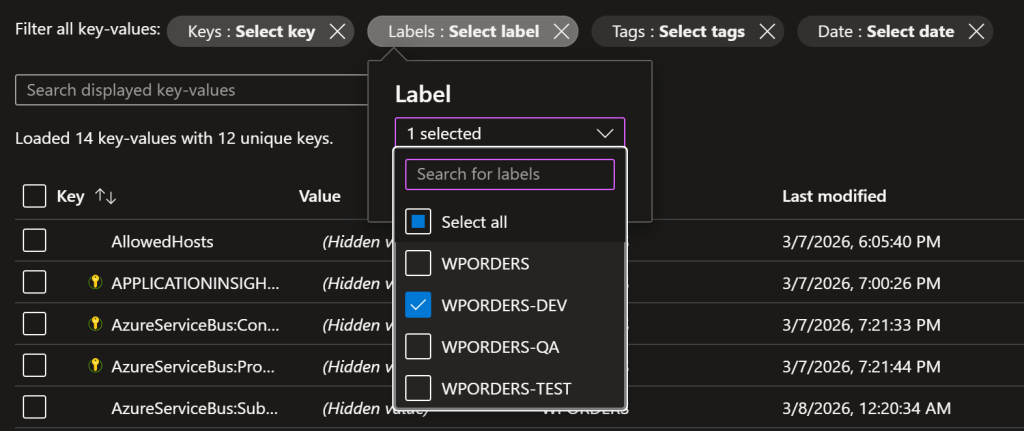
Labels (Filters)
We can filter configuration by labels. I typically use a label per environment. If I have an API service called “WordPress Orders (WPORDERS)” and it has several environments I may have these as labels “WPORDERS-DEV”, “WPORDERS-TEST”, “WPORDERS-QA”, “WPORDERS” (Production).
TIP: Managing Production Secrets
Side note: typically, I have a Non-Production Key Vault and a Production Key Vault to separate secrets. This allows for separate credentials for each environment. We can use a 1-to-many relationship with App Config and Key Vault to reduce costs and increase security. It takes an App Config Connection String + a Credential that has access to Key Vault for these two to work.
Feature Management
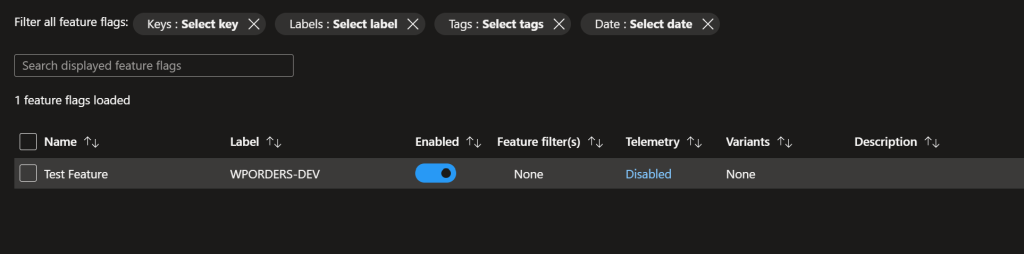
App Config has feature management flags that can turn features on and off.
Importing / Exporting
Azure App Config has the ability to filter configuration via labels. This can be used to retrieve configuration from individual environments.
Another amazing benefit (will cover this in implementation) is that we can select and retrieve multiple labels with Azure App Config. So, for example, if we have a “common” or shared configuration we can combine configuration. This means instead of distributing these settings to all of the applications we can maintain it in a single location.
Key Vault Integration
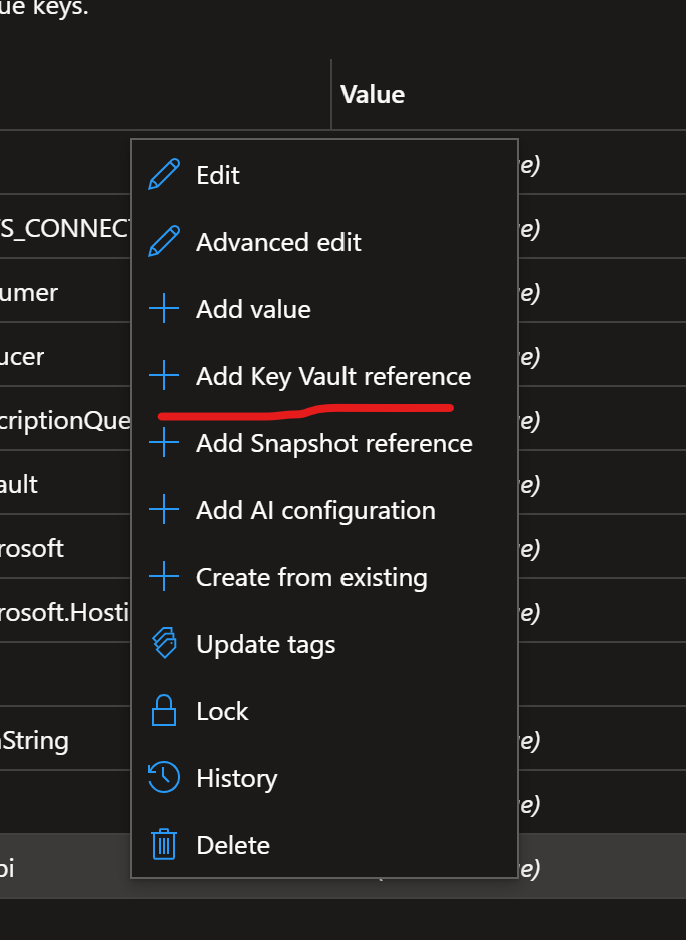
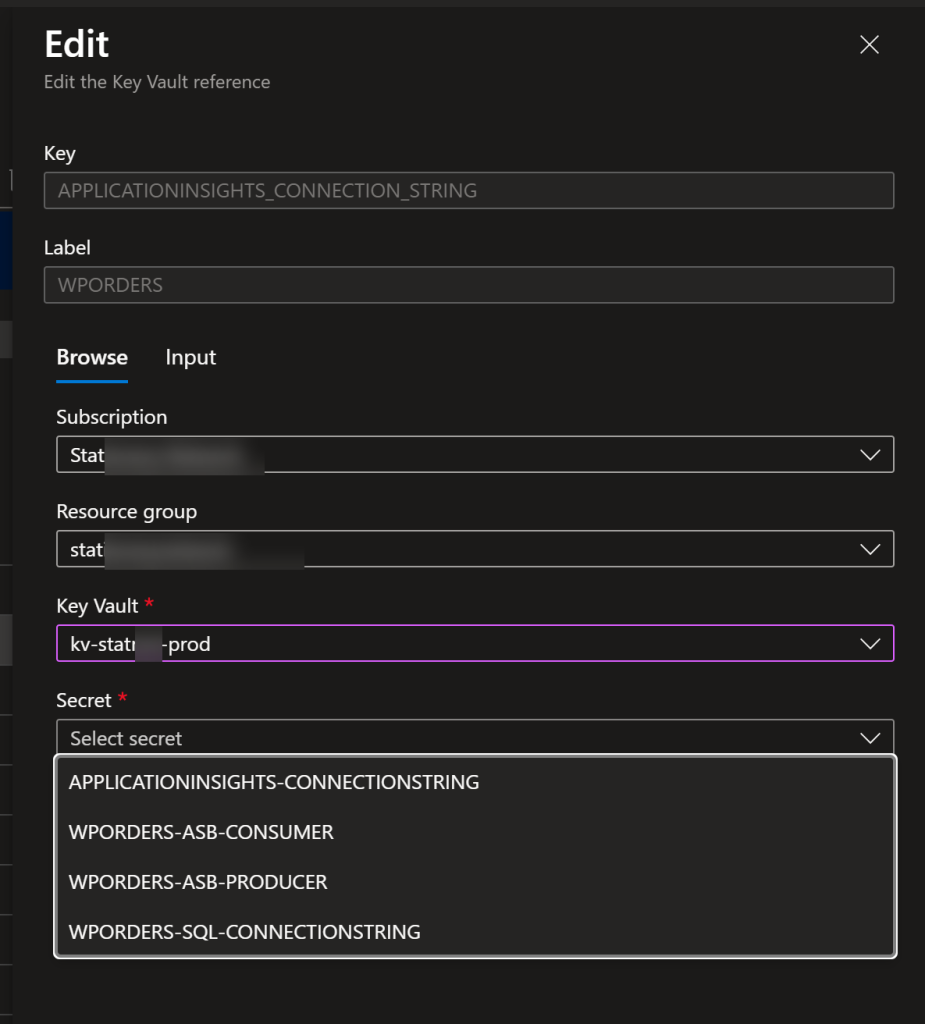
With Azure App Config we can easily link to a secret in Key Vault.
We can right-click and access a context menu in Azure App Config and then make a reference to a Key Vault Seceret.
The App Configs and Key Vaults can have a many-to-many relationship.
Implementation
public static class Builder
{
    public static TBuilder ConfigureAzureAppConfig<TBuilder>(this TBuilder builder) where TBuilder : IHostApplicationBuilder
    {
        // azure app config
        builder.Configuration.AddAzureAppConfiguration(options =>
        {
            // app config
            var appConfigConnStr = builder.Configuration["AZ_APPCONFIG_CONNECTION_STRING"];
            var azLabelFilter = builder.Configuration["AZ_APPCONFIG_LABEL_FILTER"] ?? "MRJB-APPCONFIG-DEV";

            // client id & secret
            var tenantId = builder.Configuration["AZ_TENANT_ID"];
            var clientId = builder.Configuration["AAD_CLIENT_ID"];
            var secret = builder.Configuration["AAD_CLIENT_SECRET"];

            // validation
            var missing = new List<string>();

            if (string.IsNullOrWhiteSpace(appConfigConnStr))
                missing.Add("AZ_APPCONFIG_CONNECTION_STRING");

            if (string.IsNullOrWhiteSpace(tenantId))
                missing.Add("AZ_TENANT_ID");

            if (string.IsNullOrWhiteSpace(clientId))
                missing.Add("AAD_CLIENT_ID");

            if (string.IsNullOrWhiteSpace(secret))
                missing.Add("AAD_CLIENT_SECRET");

            if (missing.Count > 0) {
                throw new InvalidOperationException("Missing required Azure App Config configuration values: " + string.Join(", ", missing));
            }

            // label(s)
            options.Select(KeyFilter.Any, azLabelFilter);

            options.Connect(appConfigConnStr).ConfigureKeyVault(kv => {
                kv.SetCredential(new ClientSecretCredential(tenantId, clientId, secret));
            });
        });

        return builder;
    }
}
Filtering Multiple Labels
If we wanted to return more than one label, we can.
A stick built house under construction New build roof with wooden truss, post and beam framework.
Builder.cs: Dependency Configuration
I can’t take credit for this pattern but some co-workers of mine showed me this and I absolutely fell in love with this pattern. Instead of creating an extensions folder and adding all of the configuration classes and methods.. Why not just create a single class called Builder.cs and put it in the root? I started trying this out on projects and I now find it to be a very good way of organizing dependency injection and configuration. It’s a common pattern that can easily be used across multiple projects.
This is a very useful trick especially if we’re developing NuGet packages that are being reshared and may need standard configuration with the ability to override.
Here’s a configuration extension for MassTransit that allows overriding default values.
   public static IServiceCollection ConfigureMassTransit(this IServiceCollection services, MassTransitConfiguration masstransitConfig,
       Action<IServiceCollectionBusConfigurator> actionMasstransit = null,
       Action<IBusRegistrationContext, IServiceBusBusFactoryConfigurator> serviceBusAction = null,
       Action<IBusRegistrationContext, IRabbitMqBusFactoryConfigurator> rabbitMqAction = null,
       Action<IBusRegistrationContext, IAmazonSqsBusFactoryConfigurator> amazonSqsAction = null)
   {
       services.AddMassTransit(x =>
       {
           if (masstransitConfig.Service == MassTransitServiceType.AzureServiceBus)
           {
               actionMasstransit?.Invoke(x);

               x.UsingAzureServiceBus((context, cfg) =>
               {
                   cfg.Host(masstransitConfig.AzureServiceBus.ConnectionString);

                   serviceBusAction?.Invoke(context, cfg);
               });
           }
           else if (masstransitConfig.Service == MassTransitServiceType.RabbitMq)
           {
               actionMasstransit?.Invoke(x);

               x.UsingRabbitMq((context, cfg) =>
               {
                   cfg.Host(masstransitConfig.RabbitMq.Host, masstransitConfig.RabbitMq.VirtualHost, h =>
                   {
                       h.Username(masstransitConfig.RabbitMq.Username);
                       h.Password(masstransitConfig.RabbitMq.Password);
                   });

                   rabbitMqAction?.Invoke(context, cfg);
               });
           }
           else if (masstransitConfig.Service == MassTransitServiceType.AmazonSqs)
           {
               actionMasstransit?.Invoke(x);

               x.UsingAmazonSqs((context, cfg) =>
               {
                   cfg.Host(masstransitConfig.AmazonSqs.Host, h =>
                   {
                       h.AccessKey(masstransitConfig.AmazonSqs.AccessKey);
                       h.SecretKey(masstransitConfig.AmazonSqs.SecretKey);

                       // specify a scope for all queues
                       h.Scope(masstransitConfig.AmazonSqs.Scope);

                       // scope top ics as well
                       h.EnableScopedTopics();
                   });

                   amazonSqsAction?.Invoke(context, cfg);
               });
           }
       });

       return services;
   }
Closeup image of people holding and exchange or convert bitcoins to dollars banknotes
IdentityServer: Token Exchange
This custom Token Exchange Grant Flow allows IdentityServer to exchange a reference token through the creation of a new JWT token. There are many reasons why this may need to be done. The documentation on this process isn’t as clear and I thought it would help others if I shared what I learned and experienced.
We’ll also use POSTMAN to demonstrate these flows.
A reference token can be used for a higher level of security but this presents a challenge and can put a huge load on the IdentityServer because downstream microservices may use Token Introspection. Imagine, a user requests a Reference Token and that token has to hit the introspection endpoint for each microservice that it comes in contact with. This is where the problem exists… Another option is to use an aggregate microservice or incorporate this into an Azure APIM policy.
API: Token Introspection Code
A .NET API may use code that introspects the Reference Token. When the API receives the Reference Token it will post to the IdentityServer to get the claims associated with that token.
services.AddAuthentication("token")
    .AddOAuth2Introspection("token", options =>
    {
        options.Authority = Constants.Authority;

        // this maps to the API resource name and secret
        options.ClientId = "resource1";
        options.ClientSecret = "secret";
    });
Token Exchange Code
This code will allow the creation of a custom Grant Flow that allows a Reference Token to go in and a JWT Token to come out.
public class TokenExchangeFlow : IExtensionGrantValidator
{
    // logging
    private readonly ILogger<TokenExchangeFlow> _logger;

    private readonly IdentityServerTools _tools;
    private readonly ITokenValidator _validator;

    /// <summary>
    /// This grant type validates incoming reference tokens and returns a "JWT" token to the APIM.
    /// </summary>
    public string GrantType => OidcConstants.GrantTypes.TokenExchange;

    public TokenExchangeFlow(ILogger<TokenExchangeFlow> logger, IdentityServerTools tools, ITokenValidator validator)
    {
        _logger = logger;
        _tools = tools;
        _validator = validator;
    }

    public async Task ValidateAsync(ExtensionGrantValidationContext context)
    {
        _logger.LogInformation($"Client ID: {context.Request.ClientId} Using Token Exchange Grant Flow.");

        try
        {
            // default response is error
            context.Result = new GrantValidationResult(TokenRequestErrors.InvalidRequest);

            // incoming token
            var subjectToken = context.Request.Raw.Get(OidcConstants.TokenRequest.SubjectToken);

            // token type
            var subjectTokenType = context.Request.Raw.Get(OidcConstants.TokenRequest.SubjectTokenType);

            // mandatory parameters
            if (String.IsNullOrWhiteSpace(subjectToken)) {
                return;
            }

            // for our impersonation/delegation scenario we require an access token
            if (!String.IsNullOrWhiteSpace(subjectToken)) {
                return;
            }

            // validate the incoming access token with the built-in token validator
            var validationResult = await _validator.ValidateAccessTokenAsync(subjectToken);

            if (validationResult == null || validationResult.IsError) {
                return;
            }

            // variables
            var clientId = validationResult.Claims?.First(x => x.Type == JwtClaimTypes.ClientId).Value;

            // scopes
            var scopes = validationResult.Claims?.Where(x => x.Type == JwtClaimTypes.Scope)
                                                            .Select(x => x.Value)
                                                            .ToList();

            // override scopes
            context.Request.RequestedScopes = scopes;

            // parsed scopes
            var parsedScopes = new HashSet<ParsedScopeValue>();

            foreach (var scope in scopes)
            {
                parsedScopes.Add(new ParsedScopeValue(scope));
            }

            context.Request.ValidatedResources.ParsedScopes = parsedScopes;

            // reference token expiration
            var refTokenExpiration = validationResult.Claims?.SingleOrDefault(x => x.Type == JwtClaimTypes.Expiration)!.Value;

            // the spec allows for various token types, most commonly your return an access token
            var customResponse = new Dictionary<string, object>
                {
                    { OidcConstants.TokenResponse.IssuedTokenType, OidcConstants.TokenTypeIdentifiers.Jwt },
                    { "reference_token_expires_in", refTokenExpiration }
                };

            // request context
            context.Request.ClientId = clientId;

            // set validation result
            context.Result = new GrantValidationResult(customResponse: customResponse);
        }
        catch (Exception ex)
        {
            _logger.LogError(ex, ex.Message, null);
            context.Result = new GrantValidationResult(TokenRequestErrors.InvalidRequest, errorDescription: ex.Message);
        }
    }
}
Closeup view of a suspended boxer engine in a dark garage or workshop
.NET Microservices: Project Structure with Git Submodules
After working in microservice architecture for many years I have concluded there are many different strategies to project structures. In some cases, these solutions share libraries, and code, and may rely on one another as a whole solution. With the advancement of .NET Aspire, I think this structure for a project solution is very useful. It takes into consideration a lot of different approaches and still offers an enormous amount of flexibility.
With anything related to software, there will be trade-offs. While microservice architecture is advanced so is this approach to repository management. We should always consider where the team is what they are capable of doing, what editors we are using, and what’s more productive at that current moment.
Positives
A “root” parent Git repo with submodules.
Atomicity: Individual Git Repositories for each Project
Easily see build issues, step through code
Very good support in Visual Studio
Can be used to troubleshoot complex projects where code has been shared.
Greater flexibility in branching strategies.
Negatives
Docker build contexts are relative (multiple Dockerfiles)
More complex and not for beginners
In other editors, situations there may be less support for Git Submodules and this requires a higher level of Git command line knowledge.
It can be confusing, especially for developers who don’t understand Git well.
Using re-useable libraries (NuGet packages) can be extremely risky and create a lot of unnecessary dependencies leading to a DLL nightmare. (Some developers choose or inherit code like this… here’s a way to deal with it…)
Root Project
The root project will pull all of the sub-projects in through Git Submodules. This is very useful because a solution can contain many sub-projects and connect everything. In some cases, this would allow easy step-through of code with libraries (NuGet packages).
.NET Aspire
Microsoft keeps improving .NET and making containerization easier and with the preview release of .NET Aspire we can get a good idea of where they are going with this. I believe this stemmed from Project Ty, but this cloud-ready stack pulls Application Logs, Containers, Metrics, and Configuration into a single dashboard known as “.NET Aspire“. There is also the ability to do orchestration of adding services like a Redis Cache.
Submodules: Individual Projects
By using Git Submodules we can add individual projects to the Root Project. This will allow the autonomy of those repositories while having a single solution for developing a solution that may use multiple microservices.
Shared Libraries (DLLs/NuGet Packages)
Sharing a library between multiple projects can bring some cohesion to a solution. It’s very controversial and heavily debated among developers. This is something I will harp on here to provide my experience and perspective on the different approaches.
Dependency Risks
There are a lot of different risks and challenges to sharing code among microservices.
NuGet Libraries & Build Pipelines
I’m not crazy about creating shared libraries in the form of NuGet packages. This sounds wonderful, but in practice, there are a lot of negative tradeoffs, risks, and concerns that I have with this choice. I find them very difficult to troubleshoot and support. Think about if we have a NuGet package that is referenced by many projects and a build pipeline then we have to approve, merge code, run the build pipeline, and update the projects just to validate the changes in the package, what a headache.
My Recommendation
I prefer the submodule approach here, I can switch out my references from NuGet packages to the actual library and step through or, I could clone that project locally and add it as a referenced project. The submodule approach is more fluent with the team by keeping this process consistent and everything all in one place with one structure.
Shared Libraries in a Single Repository
With this approach, it is very common for developers to have a single repository with multiple projects using a shared library. This works fairly well, however, this approach doesn’t allow as much granulation, control, and independence as using git submodules. This means that if we are making changes in the library we are also making changes in other projects and everything would have to be merged at once. I find this more practical than using NuGet packages, it’s far less cumbersome.
My Recommendation
If we choose to do this then we should make smaller changes as opposed to larger sweeping changes. That way merges go smoother.
Referenced 3rd Party Libraries Blocking Updates
This is probably the biggest “gotcha” with sharing code whether it is through a referenced project or a NuGet package, but often, developers will reference and implement code into their libraries that can’t be managed easily. What I mean by this, is I’ve seen solutions where a library using AutoMapper references a version that isn’t compatible with a higher version of .NET. This meant that it wasn’t possible to update the microservice without updating the package, but, we weren’t able to update the package without updating all of the other microservices. This results in a drift between the microservices and packages. It updates everything or not… and this doesn’t allow for the independence we need in a microservice architecture.
My Recommendation
I would personally copy as much code as I can into the individual microservice. Most of it’s boilerplate-like code that should be specific to that service.
Team & Cross Team Risks
I’m not opposed to sharing libraries, it just all depends on the circumstances including how large the project is, how much control the team has over the microservices, etc. If an entire team has domain and control over the entire project it seems to go, okay, however, when two separate teams try and do this it can be catastrophic. There is always a lot of miscommunication or no communication at all. Certain types of code should not be put in a NuGet package because microservices should have atomicity and exist without any other outside dependencies. If we share a library and pin-point a version of AutoMapper then all of the projects that inherit it are dependent upon that version of AutoMapper. This can make upgrading projects very difficult and potentially distribute vulnerabilities to projects.
My Recommendation
Do this as little as possible. If necessary be extremely conservative with this choice. Other teams may have different testing processes and go through a completely different release process. These kinds of changes can impact others heavily.
Sharing Models
This is a big “no-no” in microservice architecture but it’s also a very common problem. I would argue that each microservice should have its own models. That way, when we update a library we aren’t breaking internal business logic that the app may rely on or impacting the design of the microservice’s database.
My Recommendation
If we were to create a library to share data, especially when dealing with event bus-driven architectures, I think this can be done well but several things have to be taken into consideration. There are a couple of tricks here to make this work, use Abstract Models, Model Interfaces, and/or combine this with AutoMapper to map to the microservice’s models. That way, if something changes, it’s easy to update and manage.
Visual Studio / Git CLI Considerations
I find that the vast majority of developers, especially the ones who came from Team Foundation Server (TFS) traditionally use the interface to push and pull their code. This may be out of habit, but, not all .NET Developers will know how to use Git via command line. My opinion here is that it will be easy for developers who are strong with Git CLI to set this up and developers who are not can easily push and pull their changes via Visual Studio.
Visual Studio has Amazing Support for Git Submodules
I love how incredible Visual Studio is and it has incredible support for Git Submodules. It’s very easy to select which repository we want to push, pull, and merge code with.
Docker Configuration
This is another challenging aspect of doing projects like this. While each Project contains project metadata that allows for defining where the build context is, this gets tricky when we reference files outside of the individual project.
Docker Build/Run Scripts
I often create PowerShell scripts that build and run the Dockerfiles. I prefer them to be in the root project, with a Git Submodule approach this is much more challenging. The reason being is that the Docker build file context is relative to the path. This can be impacted in multiple ways, if we want to copy in our local versions of NuGet packages or Shared Libraries we will have to create a separate Dockerfiles.root for those scenarios.
Tutorial: Creating a Root Project
First, you’ll want to create the root repository that will pull in all of the Git Submodules. Once this project is created we will then add submodules to that project.
Adding a Git Submodule
There are several different ways to add Git Submodules but this covers the important concepts. The -b main specifies which branch to add to the repository. The trailing code/Common specifies the folder that it will go into. This is important for easily managing the project.
Adding the Common Shared Project (.DLL)
Add the common repo as a submodule with the main branch
git submodule add -b main [email protected]:mrjamiebowman-blog/microservices-projectstructure-common.git code/Common

# update your submodules
git submodule update --remote
Adding the API Project
Add the “API” repo as a submodule with the “main” branch
git submodule add -b main [email protected]:mrjamiebowman-blog/microservices-projectstructure-api.git code/Api

# update your submodules
git submodule update --remote
Adding the Web Project
Add the “Web” repo as a submodule with the “main” branch
git submodule add -b main [email protected]:mrjamiebowman-blog/microservices-projectstructure-web.git code/Web

# update your submodules
git submodule update --remote
Once the Git Submodules are added we’ll see references to them in the repo that will contain a shortened SHA-1 hash ID to their current state in a repository.
(Root Project repo after the Git Submodules have been added)
Tutorial: Cloning a Root Project
Cloning a repository with Git Submodules can be done in several ways. We can either do a recursive clone or clone the repository and then update.
Recursive Clone
git clone --recurse-submodules [email protected]:mrjamiebowman-blog/microservices-projectstructure-root.git
cd microservices-projectstructure-root
Beautiful sailboats moored in the dock, amazing view of gorgeous white sail boats over mountains background in mild sunset light, luxury summer vacation in Marmaris, Turkey
Resetting SA Password in MSSQL Server Docker 2022
This was a bit tricky, so I thought I would share how this can actually be done. I found this difficult for several reasons. For one, SQL Server must be stopped for the script to work, because this is a container, it is not using systemctl, therefore terminating the SQL Server using a kill command results in the container exiting.
I figured out that stopping the container entirely, committing the container, and running a new container while overriding the entry point worked.
Commit Container
docker commit ${CONTAINER_ID} mrjb/mssql-test
Run Container
You will need to run a new instance of the committed container.
docker run -ti -u 0 --entrypoint=/bin/bash -v '/mnt/user/appdata/mssql':'/var/opt/mssql':'rw' mrjb/mssql-test
Running: mssql-conf set-sa-password
There are binaries that can be run to configure the SQL Server and they are located in this folder: cd /opt/mssql/bin
Running the command below will reset the password to whatever you put in the MSSQL_SA_PASSWORD environment variable.
If you are seeing the error in Istio’s Kialia that says that the app and version label are missing from the deployment then this post will help you. Istio needs an app and version labels to produce accurate telemetry related to your applications. By adding these two labels you will also have your app show up under the Applications tab of Kiali.
Pod Selectors are immutable.
Pods with app and version labels: We recommend adding an explicit app label and version label to the specification of the pods deployed using a Kubernetes Deployment. The app and version labels add contextual information to the metrics and telemetry that Istio collects. (https://istio.io/latest/docs/ops/deployment/requirements/)
Solution: Creating App and Version Labels on the Pods
The easiest way to do this is to modify the values.yaml file to include 2 variables for the pod app and version label. Then map those values into the pod via the deployment.yaml file in the helm charts.
Modifying the values.yaml to for “Pod Labels”
values.yaml
podLabels:
  app: "ms-app-api"
  version: "1.0.0"
Templating
Next, you will want to modify the _helpers.tpl template file to add this snippet below.
_helpers.tpl
{{/*
Pod labels
*/}}
{{- define "ms-app-api.podlabels" -}}
{{- if .Values.podLabels.app }}
app: {{ .Values.podLabels.app }}
{{- end }}
{{- if .Values.podLabels.version }}
version: {{ .Values.podLabels.version }}
{{- end }}
{{- end }}
Modifying the Deployment Manifest
Modifying the deployment manifest will make mapping the pod labels in easily.
Beautiful green tropical jungle for natural background
.NET: Open Policy Agent (OPA) with Styra DAS
Open Policy Agent (OPA), pronounced “oh-pha”, is an incredible technology for decoupling authorization from applications. Styra the company that creates and maintains OPA has a tool called Styra DAS that provides a UI for visualizing decisions, authorizations, troubleshooting, testing, and monitoring policy. This tutorial will demonstrate how to set up Styra DAS on a custom namespace, apply mutations, and deploy your first .NET API microservice that uses OPA.
This tutorial will demonstrate how to integrate Styra DAS/OPA into a .NET Microservice running on a Kubernetes cluster with Istio as the gateway.
Note: My current home lab is an HPE Gen 10 Microserver running VMware ESXi 8 and I am running a Virtual Machine with Ubuntu and Rancher RKE single node cluster. I’m using Azure DevOps to build and push the image to the Container Registry and ArgoCD to continuously deploy helm, Kubernetes, and application changes to the cluster.
Open Policy Agent (OPA)
Using OPA has some profound benefits that can make your environment more secure, safe, and testable, but, get this, the developers no longer have to write authorization code.
Decoupled Architecture
Decoupling authorization code from your services has a lot of hidden benefits. OPA policies have the capability of inheriting other policies and thus sharing rules with other policies through Rego code. This means there is less policy code and duplication which follows the Don’t Repeat Yourself (DRY) principle. Simply reducing code reduces mistakes. These policies can be checked into source control and maintained separately from the applications.
Rego Code
Rego code is straightforward to learn and get started with. It’s very capable of doing complex things like JWT Validation and API calls to validate access. Rego policies are shipped and stored together in what are known as Bundles.
There are many different architectures for setting up OPA, but in this tutorial, OPA sits as a sidecar on a Kubernetes pod admitting access to the underlying service based on policy decisions. OPA can be more secure in the sense that policy decisions can easily be logged, validated, replayed, and tested. The life cycle of OPA policies in general is going to be far more secure than having authorization code distributed throughout the code of multiple applications. Having it better organized will lead to better Cloud Governance, especially at scale. There have been some concerns about Kubernetes cluster security, however, if a hacker has compromised the cluster then you’re going to have much bigger problems. If a hacker compromises an individual service and is able to execute commands against other internal APIs, those services will still be protected through OPA. The policies will still apply and the hacker will be limited.
Testing
Rego policies can easily be tested through Rego test code and instructions. This is wonderful because if a policy has changed the tests can be written, ran, and reviewed for thoroughness. This can significantly reduce mistakes through a system of checks and balances.
CI/CD Pipeline Compatible
Rego Bundles can be produced, packaged, and tested in a Continous Integration (CI) / Continous Deployment (CD) scenario. This means with a click of a button your application’s authorization code can be updated without re-deploying the apps. Not to mention, this bundle will not be deployed if all of the policy tests don’t pass.
Styra DAS
Hold on to your mouse! Styra DAS has to be the hottest-coolest Identity tool that I’ve seen come to market. I have absolutely been blown away by what Styra DAS is capable of.
Flexibility
(Styra DAS supports many different types of systems)
Styra is capable of being installed on many different types of systems.
Common Systems
Envoy
Istio
Kong Gateway / Mesh
Kubernetes
Terraform
Architectural Patterns
In addition, there are several different common architectural patterns that Styra DAS supports.
Capabilities
Styra DAS is much more than just an interface to Rego policy and decisions. It is very capable of doing much more than that.
Kubernetes Mutations
This has to be one of Styra’s most impressive features. Using Rego code, mutations can be dynamically applied to the Kubernetes manifest based on policy. In the tutorial below we will mutate pods to inject the OPA sidecar and bundle based on the namespace and other validating requirements (is it a pod? is it a create? ..or update? etc…).
The search capabilities of Styra DAS are built on Lucene syntax.
Policy Replay
Being able to replay and analyze a policy decision is absolutely crucial for being able to determine why and how a rule or decision was applied. This allows for much quicker development, support, and management of policies.
In this next image, we can see that the user does not have the correct role to access /api/security/grid .
So this is where it gets tricky and Styra DAS really starts to shine with its extensive features. I found this process a bit confusing since there are many different ways to configure Styra DAS systems and different styles of architecture. Styra was very willing to help me understand and configure this. Their Technical Architect, Kurt Roekle was very helpful and provided a sample mutation that I modified to work with this particular scenario. In order to do this, I need to install 2 systems, one for Kubernetes and one for Istio which will provide application-level authorization and policy decisions through an injected sidecar. The Kubernetes system would track cluster-level authorization and apply mutations.
System ID
Each Styra DAS system will have a unique System ID that is often used in configuration and is important to know for troubleshooting.
Installing Styra DAS to a Kubernetes System
It is best to install the Kubernetes system first before installing the Istio system. It’s going to be much easier to install and it’s required for the pod mutations. If this can’t be installed and working none of the processes below will work either.
// TODO: PICS / INSTRUCTIONS
Installing Styra DAS to an Istio System
Note:Installing the Istio System is a bit tricky when it comes to deploying to a custom namespace but I will show you how to do this. This part may be updated and removed entirely because I hear they are planning on adding the ability to set the namespace on the deployment. This section is subject to change.
Create the Istio System
Creating the Istio System in Styra DAS is very easy. Just name it and click “Add system”. This will open a window that defaults to the “Settings” tab with Install instructions.
Download the Manifest Files
Instead of running the commands in the settings, we will download the manifest files so we can modify them before deploying this to our Kubernetes cluster. That way we can add our custom namespace to their manifest files.
Modifying the Manifest Files
The manifest files as they are will deploy to the default namespace since they don’t have a specified namespace. We need to modify this so it goes to the “myapp” namespace by adding the namespace property through a variable.
With this architectural pattern with Styra DAS, we will create a new system for each set of microservices. Therefore, we need to modify the manifest files to include the namespace that it belongs to.
Now, there are 3 files downloaded and I will include these in the Helm chart, however, the EnvoyFilter.yaml doesn’t need to be modified. I include that in the Helm charts just because it’s easier to keep it all together.
Modifying values.yaml
The Helm values.yaml file should be empty and contain this value.
namespace: "myapp"
Modifying OpaConfig.yaml
This one is easy all you have to do here is add the namespace to the metadata path. Also, take note that the System ID is used here.
metadata:

  namespace: {{ .Values.namespace }}
Modifying Slp.yaml
The slp.yaml file has a lot of services necessary to install and set up the Styra Local Control Plane (SLP) and will require careful attention.
All of the individual manifests (Secret, Service, StatefulSet) will need this added to them.
metadata:
  namespace: {{ .Values.namespace }}
The StatefulSet has a property for creating a Volume Claim, add it there.
Run this command after modifying the files with the namespace.
# deploy styra das
helm install -n myapp charts/styradas
Verifying the Styra DAS Installation
To verify that the service has deployed correctly you will want to check several things to know if Styra DAS was deployed correctly.
Logs
The logs should look like JSON without any errors.
(Failed Installation)
OPA Sidecar
We want to make sure that the mutation does not apply an OPA sidecar to this service. At this point, we haven’t set up the mutation but sometimes we re-create systems and clusters so it’s a good habit to learn to check this. When I run the command below I can see 1/1 containers ready. This tells me that the OPA sidecar was not injected. This is good because if it had been injected there would be 1/2 in the READY state.
kubectl get pods -n myapp

NAME              READY   STATUS    RESTARTS   AGE
slp-istio-app-0   1/1     Running   0          114s
ConfigMap
If you are deploying multiple times it may be a good idea to check the opa-istio-config to see if the System ID matches.
kubectl get cm -n myapp

NAME                  DATA   AGE
istio-ca-root-cert    1      6m59s
kube-root-ca.crt     1      6m59s
opa-istio-config      1      4m39s
Secrets
This secret contains the token bearer access token that is needed to communicate with Styra DAS.
kubectl get secrets -n myapp

NAME                             TYPE                 DATA   AGE
sh.helm.release.v1.styradas.v1   helm.sh/release.v1   1      5m5s
slp-istio                        Opaque               1      5m5s
Setting up Pod Mutations in Styra DAS
(Mutations are easy to modify, enable/disable, and are written using Rego.)
I was completely unaware that this is a strategy for injecting OPA sidecars into pods but I can assure you, this is the best way I’ve seen this done. This technique gives a lot of flexibility with which pods get OPA injected whereas a namespace label would apply to all pods in a namespace. Manually applying this through manifest would still mean the application has to be redeployed. Using Styra DAS allows me to dynamically apply this policy in several ways. If I needed to disable it, I could modify the mutation by setting it to “Monitor” or “Ignore”, then restart the deployment, and the OPA sidecar would be removed. I can modify the mutation and restart the application deployment to see if the sidecar has been injected. It’s actually very easy once you learn it.
I also recommend the OPA and Styra Slack Channels.
This will demonstrate using a simple API that authorizes through the Identity Server using a username and password credentials. The application will be minimal and run in a Docker container deployed on Kubernetes through Helm. The Helm charts will be included in the GitHub repository.
.NET 8 Minimal API
With the latest .NET, building minimal APIs is very easy and can be done on a single .csharp file. This service will have 3 API Methods that will be protected through OPA.
using MrJB.OPA.StyraDas.API;

var builder = WebApplication.CreateSlimBuilder(args);

var app = builder.Build();

var securityApi = app.MapGroup("api/security/grid");
securityApi.MapGet("/", () => Results.Ok("Access Granted Security Grid!"));

var systemApi = app.MapGroup("api/system/test");
systemApi.MapGet("/", () => Results.Ok("Access Granted to System Test!"));

app.Run();
Note:.NET 8 is currently in preview and will be released in November of 2023 and be tagged as a Long Term Support (LTS) release.
Deploy Application Helm Charts
# deploy microservice api
helm install -n myapp charts/myapp
Verifying the Pod Mutations
If the app is deploying it should create 3 containers (Istio, OPA, App) and 1 init container (Istio startup). We need to verify a few things to make sure it’s starting up correctly. First, we’ll want to check that the OPA container is there and that it is not throwing any errors. Then we can view the schema of the Pod just to look over the modified YAML.
OPA Policy
/api/up – always allow anonymous /api/security/grid – only allow Dennis /api/system/test – allow Ray and Dennis
package policy.ingress

import future.keywords
import input.attributes.request.http as http_request
import input.parsed_path

default allow = false

# allow opa health check
allow {
    parsed_path[0] == "health"
    http_request.method == "GET"
}

# allow /api/hc
allow {
    parsed_path[0] == "api"
    parsed_path[1] == "hc"
    http_request.method == "GET"
}

# allow /api/up
allow {
    parsed_path[0] == "api"
    parsed_path[1] == "up"
    http_request.method == "GET"
}

allow if {
	some r in roles_for_user
	r in required_roles
}

roles_for_user contains r if {
	some r in user_roles[user_name]
}

required_roles contains r if {
	some perm in role_perms[r]
	perm.method == http_request.method
	perm.path == http_request.path
}

user_name := parsed if {
	[_, encoded] := split(http_request.headers.authorization, " ")
	[parsed, _] := split(base64url.decode(encoded), ":")
}

user_roles := {
	"ray": ["guest"],
	"dennis": ["admin"],
}

role_perms := {
	"guest": [{"method": "GET", "path": "/api/system/test"}],
	"admin": [
		{"method": "GET", "path": "/api/security/grid"},
		{"method": "GET", "path": "/api/system/test"}
	],
}
Testing Authorization
We will demonstrate this using basic auth which will not check the password and only verify that the Username matches the correct path and security role.
# get ip of the service
export SERVICE_HOST=$(kubectl -n myapp get service myapp -o jsonpath='{.status.loadBalancer.ingress[0].ip}')

# allow all
curl -i http://$SERVICE_HOST/api/up

# dennis
curl --user dennis:password -i http://$SERVICE_HOST/api/security/grid
curl --user dennis:password -i http://$SERVICE_HOST/api/system/test

# ray
curl --user ray:password -i http://$SERVICE_HOST/api/security/grid
curl --user ray:password -i http://$SERVICE_HOST/api/system/test
purple nebula and glowing cosmic dust in outer space
Upgrade Ubuntu Server (21.10) to the Latest Version
This guide will walk through upgrading an Ubuntu Server (21.10) to the latest version. This is very easy but there are some caveats that need addressing along the process.
Update Software
It’s important to update your software before upgrading so things go smoother and prevent failures. To update the software on the Ubuntu Server you will likely need to check and upgrade the sources list. Ubuntu has what seems like 2 repositories for their distro releases. If you look at the folders below in the release links, you will see that your distro may not be listed in the current releases repository. If this is the case, you will need to update your sources list.
Editing the sources list is rather easy. First, make a backup of your sources file by running sudo cp /etc/apt/sources.list /etc/apt/sources.list.bk . I prefer Vim but you may use Nano. Open your sources file in your editor. sudo vim /etc/apt/sources.list then run this Vim command to replace all instances of the string. :%s/us\.archive/old-releases/g This may not be the case for everyone but the general idea here is to replace whatever repository is there with the “old-releases” repository so that Ubuntu can continue to get updates.
Update Ubuntu Release
To finish the release run this command: sudo do-release-upgrade